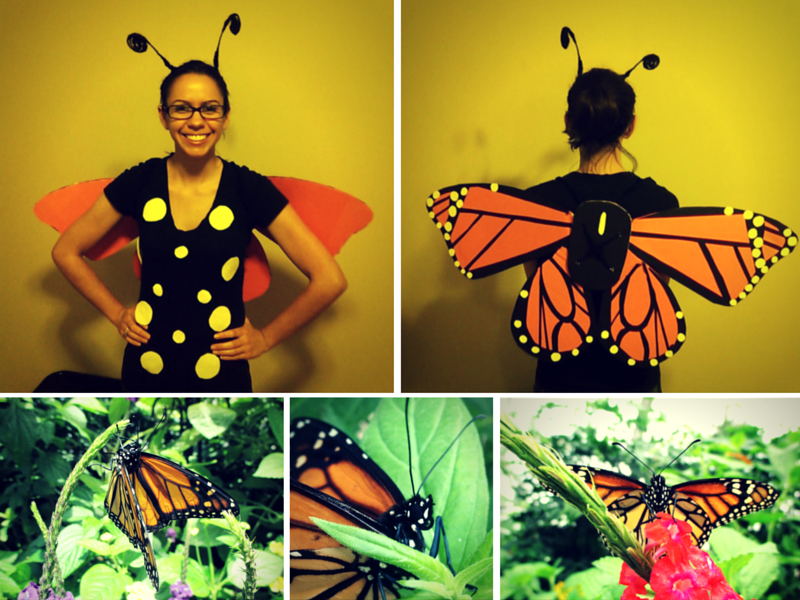
DIY Monarch Butterfly Halloween Costume
Halloween is right around the corner and maybe you’re scrambling for an awesome, yet easy last-minute costume. Well put your Halloween worries aside, because this monarch butterfly costume is just what you need. You will love this costume — it’s quick and super easy, recyclable (mostly), and while it’s a butterfly, it can also be used to make a Halloween fairy. Plus, if you are so inclined, you could use it year-round. So really, what’s not to love?
DIY Monarch Costume
Here’s what you needed:
- 1 large cardboard box
- Marker or Sharpie
- Scissors
- Glue or glue Stick
- Tape or safety pins
- Paper (crafting, scrapbook, poster board)
*black, orange, and white paper for monarch - White felt
- 1 Spool of wire yarn
- Black clothing (shirt and pants or dress with stockings)
- A little bit of creativity
Step 1: Find a butterfly to base your design on. I personally chose to create a female Monarch (Danaus plexippus) because it’s one of my favorite native pollinators, and its wings are Halloween colors.
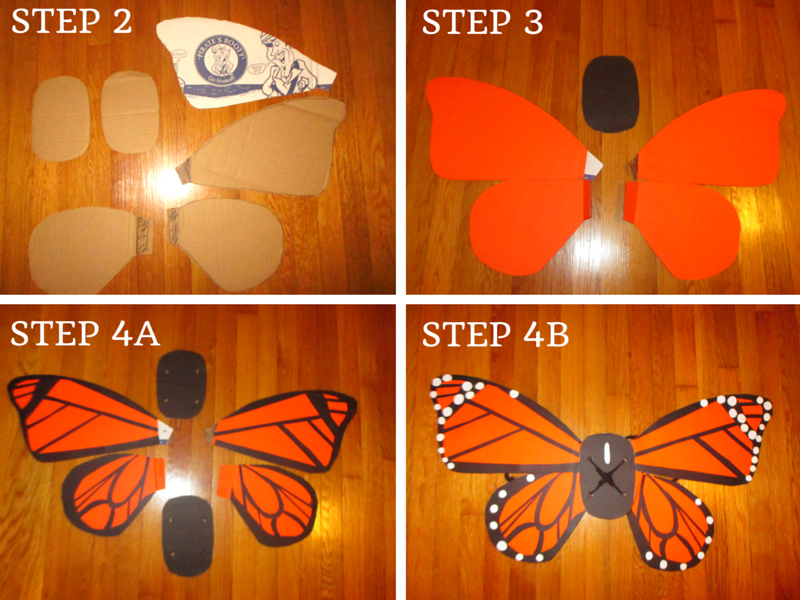
Step 2: Lay out the cardboard box and draw a set of forewings, hindwings, and 2 oval pieces for the thorax (body). Cut along the lines to form the wings and leave about 2 inches of cardboard where the wings will attach to the body.
Step 3: Once the wings are cut out, use your first color of paper (orange for a monarch) to completely cover the wings using the glue, or glue stick. Using the second color of paper (black for a monarch), cut out different patterns to form the design of the wings and glue. Cover one side of each of the two oval pieces in your second color (black for a monarch).
Step 4: Poke four holes into each thorax, measuring about 1-2 inches from the top and bottom. Then poke a hole in the tips of each wing piece, the excess cardboard. Once these holes are made, line the holes up so that each wing piece is resting between the two thorax pieces and thread the wire yarn through each hole. I secured my wings with a criss-cross pattern that mimics the lacing of shoes. Add any additions to the wings at this point. I added white circles to the edges of the wings to make the wings look more like a Monarch.
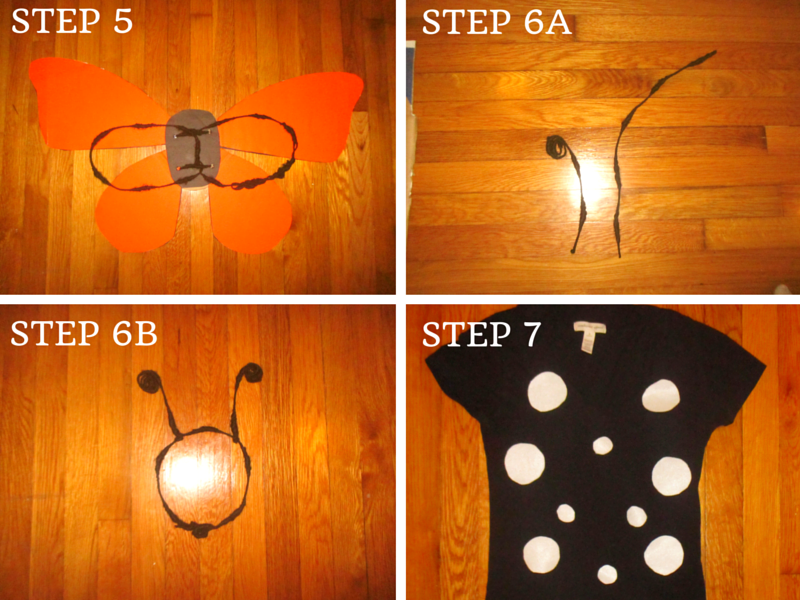
Step 5: Measure and cut approximately 3 feet of wire yarn. Thread the yarn through the two loops on the backside of the thorax, where you secured your wings. Bring the bottom string up to meet the top string and twist twice. To create straps, take each side of the wire yarn over your shoulders and adjust the length and height. Once you find the right fit, simply twist the wire around your and cut the excess yarn with the scissors.
Step 6: Cut two pieces of wire yarn measuring about a foot each, and a third piece measuring about 2 feet. Take the 2-foot-long pieces and curl one end on each piece. Next, attach these two pieces to the longer piece by twisting the uncurled ends. Now you have antenna!
Step 7: Take the white felt and cut circles in varying sizes to attach to your clothing. Attach these using tape or safety pins to your shirt or dress.
Step 8: You’re all done! Enjoy your awesome handmade costume and show it off to friends and family. Happy Halloween from the Butterflies LIVE! curators!


